
polka dot
Saturday, February 20, 2016
Coming Soon ~ Polly Headband Knitting Pattern!
I'm excited to let you know that after more than 3 years of working on my Polly Headband, it is finally ready for testing! Find more info by following the links to my website! Yay for this headband!!! I'm so excited!


Wednesday, February 17, 2016
Fergus the Frog CROCHET PATTERN

Fergus the Frog CROCHET PATTERN
$7.95
Details:
Please Note: This listing is for a CROCHET PATTERN only, not the finished item.
There is no shipping charge on this item as it is a PDF file.
The pattern will be e-mailed to you within 24 hours of purchase, to the e-mail address linked to your PayPal account.
Description:
Fergus is a true Irishman (complete with hat), as well as a natural pessimist, but underneath his rough exterior, Fergus has a big heart. He is always up for a big hug and a cuddle, which is perfect, because he always looks like he needs one!
Size:
Fergus is 14” tall from head to toe, or 7” tall when sitting, and his hat is 3” tall.
Materials:
•MC: 119yd (109m) Aran weight Light green yarn (Suggested: Lion Brand Vanna’s Choice: Kelly Green): 70g
•CC: 59yd (54m) Aran weight Dark green yarn (Suggested: Red Heart Soft: Green Leaf): 32g
•small amount Off-White yarn (Suggested: Lion Brand Vanna’s Choice: Fisherman)
•small amount Gold yarn (Suggested: Lion Brand Vanna’s Choice: Gold)
•small amount Black yarn
•small amount Pink yarn
•Size E/4 (3.5mm) crochet hook
•Darning needle
•3 stitch markers
•Polly-fill cotton batting for stuffing
•Plastic pellets for stuffed animal making
© 2016 ~Lise-Anne Michel ~ Pick n' Knit Patterns
Please respect copyright laws. You cannot resell my patterns or any finished products you make from them as they are copyrighted by me.
Enjoy and thank you for looking!
There is no shipping charge on this item as it is a PDF file.
The pattern will be e-mailed to you within 24 hours of purchase, to the e-mail address linked to your PayPal account.
Description:
Fergus is a true Irishman (complete with hat), as well as a natural pessimist, but underneath his rough exterior, Fergus has a big heart. He is always up for a big hug and a cuddle, which is perfect, because he always looks like he needs one!
Size:
Fergus is 14” tall from head to toe, or 7” tall when sitting, and his hat is 3” tall.
Materials:
•MC: 119yd (109m) Aran weight Light green yarn (Suggested: Lion Brand Vanna’s Choice: Kelly Green): 70g
•CC: 59yd (54m) Aran weight Dark green yarn (Suggested: Red Heart Soft: Green Leaf): 32g
•small amount Off-White yarn (Suggested: Lion Brand Vanna’s Choice: Fisherman)
•small amount Gold yarn (Suggested: Lion Brand Vanna’s Choice: Gold)
•small amount Black yarn
•small amount Pink yarn
•Size E/4 (3.5mm) crochet hook
•Darning needle
•3 stitch markers
•Polly-fill cotton batting for stuffing
•Plastic pellets for stuffed animal making
© 2016 ~Lise-Anne Michel ~ Pick n' Knit Patterns
Please respect copyright laws. You cannot resell my patterns or any finished products you make from them as they are copyrighted by me.
Enjoy and thank you for looking!

Tuesday, February 9, 2016
2 NEW Freebies ~ School Girl Dress Sewing Pattern Tutorial
So I've been spending a lot of time on my Dollies lately, wanting to come up with a couple little patterns for you all to try for your own little make-under dolls.
So far, I've come up with a cute little collared dress, the School Girl Dress Pattern, which is available here as a free download! I'll also be posting the matching knitted cardigan, the School Girl Cardigan Knitting Pattern shown in the pictures, which is available now on my official website. This cute little cardigan is quick and simple, and is the perfect accessory for your little dresses! Click the link to the Cardigan to access another free download, because c'mon, I just love you guys so much! I've made 3 dresses and 4 cardigans over the last couple of days, and I'm hooked! They're so much fun!
Meet my 3 newest little models: Rebecca (top), Violet (middle), and Anna (bottom). I'll post some before and after photos in the next couple of days so you can see their transformations. They've been super fun!


And, without further ado, here's a little dress tutorial to go along with the pattern.
First off, download and print the pattern pieces from one of the above links, and cut them all out.

 Pin and sew unseen edge of collar onto the bodice, with the right side of the collar facing the wrong side of the bodice.

Fold over collar to the right side and iron flat.

Create a tiny double hem for the sleeves, by folding and ironing the curved out part of the bodice where the arms will be (not down the entire outside edges, but just along the curved part until the edges straighten out). Hopefully that made sense...if not, refer to the picture.

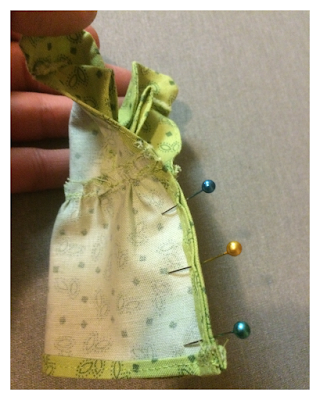
Your finished sleeve seems should look something like this...

Fold bodice in half, with right sides facing each other. Pin in place and sew from the armpits down to the waistline.

Fold back to the right side, and iron flat.

Iron down and double hem both short edges and one long edge of the skirt.
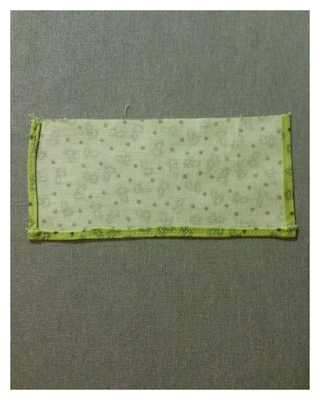
Do a loose basting stitch along the top edge of skirt (the only edge that is not yet hemmed).

Pull on ends of thread from the basting stitch to cinch the dress in, making the width of the skirt even with the bottom width of the bodice.

Pin in place and sew.

Top stitch across the bottom of the bodice for a nice finished join.

Pin Dress together with right sides facing, and sew dress closed from slightly below the waist seam down to the bottom of the dress.
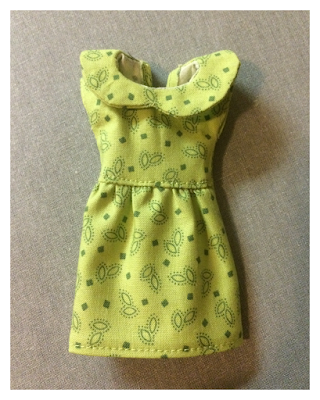
The dress should now look something like this...

Cut a 2" length of velcro (9mm in width), then cut both sides vertically in half, creating 4 pieces (4.5mm each in width).

This will be enough for two dresses, so set one set aside for a later project.

Pin one side of the velcro to the inside edge of the dress, and the other side of the velcro to the outside edge of the dress on the opposite side of the back opening.
Note: Pinning the pieces overtop the collar will prevent the collar from flipping up, so I recommend you sew the collar down along with the velcro.

Sew around all four edges of the velcro pieces.

The back of the dress should now look like this...

And tada! Your dolly is all styled and ready to go. Now you just need to give her a nice, tasteful make-under to un-Bratify her :)

So far, I've come up with a cute little collared dress, the School Girl Dress Pattern, which is available here as a free download! I'll also be posting the matching knitted cardigan, the School Girl Cardigan Knitting Pattern shown in the pictures, which is available now on my official website. This cute little cardigan is quick and simple, and is the perfect accessory for your little dresses! Click the link to the Cardigan to access another free download, because c'mon, I just love you guys so much! I've made 3 dresses and 4 cardigans over the last couple of days, and I'm hooked! They're so much fun!
Meet my 3 newest little models: Rebecca (top), Violet (middle), and Anna (bottom). I'll post some before and after photos in the next couple of days so you can see their transformations. They've been super fun!


And, without further ado, here's a little dress tutorial to go along with the pattern.
First off, download and print the pattern pieces from one of the above links, and cut them all out.

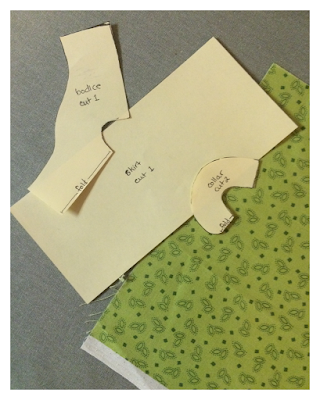
Next, use each pattern piece to cut out your corresponding fabric pieces (I used quilting cotton for my dresses). You should now have 2 collar pieces, 1 bodice piece, and 1 skirt piece, that will look something like this...

Just a hint before I continue, I did very small seams throughout. As small and teeny tiny as you can fold, iron and seam, that's the width of seam that will turn out the best. There's no 1/4" seams in this pattern, just as little and tiny as I you can manage while still obviously making sure it is secure and there are no holes. I also keep my iron out and iron down each seam I sew as I go.
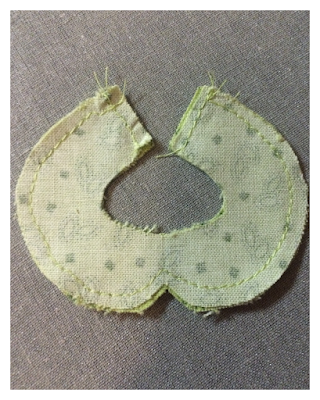
With right sides together, sew 3 sides of collar together (the 2 short end edges and the outside edge).

Turn the collar right side out and iron.
Iron down and hem back edges of the bodice, as shown below. If you can manage doing some teeny tiny little seams, doing a double hem on these edges would give it a nicer finish (I thought of this later, so this picture shows a single hem, but I will do a double hem in the future.

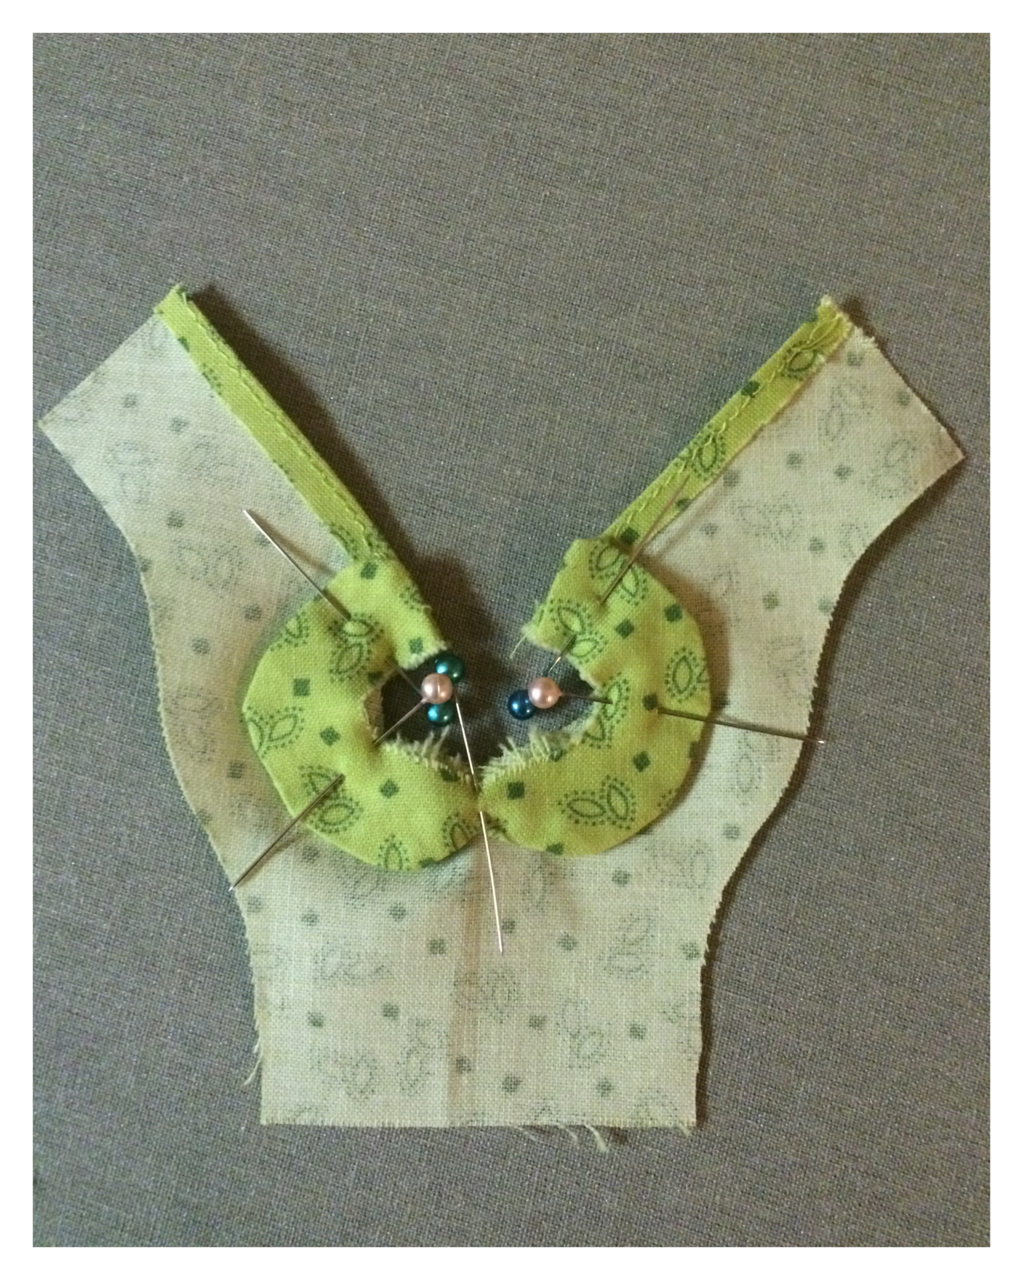
Fold over collar to the right side and iron flat.

Create a tiny double hem for the sleeves, by folding and ironing the curved out part of the bodice where the arms will be (not down the entire outside edges, but just along the curved part until the edges straighten out). Hopefully that made sense...if not, refer to the picture.

Your finished sleeve seems should look something like this...

Fold bodice in half, with right sides facing each other. Pin in place and sew from the armpits down to the waistline.

Fold back to the right side, and iron flat.

Iron down and double hem both short edges and one long edge of the skirt.


Pull on ends of thread from the basting stitch to cinch the dress in, making the width of the skirt even with the bottom width of the bodice.

Pin in place and sew.

Top stitch across the bottom of the bodice for a nice finished join.

Pin Dress together with right sides facing, and sew dress closed from slightly below the waist seam down to the bottom of the dress.

The dress should now look something like this...


Cut a 2" length of velcro (9mm in width), then cut both sides vertically in half, creating 4 pieces (4.5mm each in width).

This will be enough for two dresses, so set one set aside for a later project.

Pin one side of the velcro to the inside edge of the dress, and the other side of the velcro to the outside edge of the dress on the opposite side of the back opening.
Note: Pinning the pieces overtop the collar will prevent the collar from flipping up, so I recommend you sew the collar down along with the velcro.

Sew around all four edges of the velcro pieces.

The back of the dress should now look like this...

And tada! Your dolly is all styled and ready to go. Now you just need to give her a nice, tasteful make-under to un-Bratify her :)

Tuesday, February 2, 2016
All things NEW...
So lots has happened as of late! I am expanding somewhat, and have started releasing crochet patterns along with my knitting patterns. The reason for this is that I have tendonitis in my wrists, and I've found crochet to be a little easier on them. However, having said that, I don't plan on being finished with the knitting patterns, just hoping that going back between the two will be a little easier on me. I currently have one crochet pattern available, Groundhog Gary, which is on sale as the Pattern of the month for the month of February right now on my new website for only $5.95! If you haven't had a chance to check out / bookmark the new site, please come have a look! I'm pretty excited about it!
I'm currently in the process of having a second crochet pattern tested which has been super fun to make, Fergus the Frog, and you can find out more about Fergus as well as see more photos of him on the website as well! He should be ready for release by mid-February.

On a personal note, I am now 22 weeks pregnant with baby #5 (due June 9th), which blows my mind every day! I'm feeling really good, other than being totally exhausted, which is to be expected with 4 little kids running around regardless of being pregnant or not. Being tired is just my normal, and I wouldn't have it any other way. We just had our big ultrasound, but decided to leave the gender of the baby a surprise :) I'm planning on having another home birth, like last time, and I'm excited about that, but it does give me comfort that if need be, we only live 2 blocks away from the hospital ;)
I've been doing Zumba twice a week, which has been progressively getting tougher every time I go, and as of this week, I've started doing Piyo (Pilates/Yoga) every morning. As I sit here typing, my butt muscles are in tons of pain, as is every other muscle in my body...(sigh). I have a huge fear of scary labours (because of labour #3) and always feel a need to stay in shape while I'm pregnant so I can rock my labour when the time comes, but man, exercising is not an easy task, especially at 5:30am, which is the only time I have to do it!
Speaking of trying to stay in shape, it's hard to feel like I am even doing so when I'm pregnant, no matter what I do. People are funny. I have someone that I don't know ask me randomly at least once a day if I'm "due any day now". When I respond that I'm only halfway, they always ask if I'm having twins..."Nope, I'm just huge, thanks!" Anyway, life is generally a wonderful thing. I honestly love people. I don't mind the ignorant questions anymore, because hey, I'm kind of enormous and I can't really blame them for wondering. Most of the time they are people that clearly have not had kids or been pregnant, so they honestly don't know. Plus they probably (hopefully) feel silly afterwards for asking in the first place, so that thought always gives me some comfort. This is my 5th baby (and technically my 7th pregnancy), so I think I'm supposed to be huge, right???
I'm currently in the process of having a second crochet pattern tested which has been super fun to make, Fergus the Frog, and you can find out more about Fergus as well as see more photos of him on the website as well! He should be ready for release by mid-February.

On a personal note, I am now 22 weeks pregnant with baby #5 (due June 9th), which blows my mind every day! I'm feeling really good, other than being totally exhausted, which is to be expected with 4 little kids running around regardless of being pregnant or not. Being tired is just my normal, and I wouldn't have it any other way. We just had our big ultrasound, but decided to leave the gender of the baby a surprise :) I'm planning on having another home birth, like last time, and I'm excited about that, but it does give me comfort that if need be, we only live 2 blocks away from the hospital ;)
I've been doing Zumba twice a week, which has been progressively getting tougher every time I go, and as of this week, I've started doing Piyo (Pilates/Yoga) every morning. As I sit here typing, my butt muscles are in tons of pain, as is every other muscle in my body...(sigh). I have a huge fear of scary labours (because of labour #3) and always feel a need to stay in shape while I'm pregnant so I can rock my labour when the time comes, but man, exercising is not an easy task, especially at 5:30am, which is the only time I have to do it!
Speaking of trying to stay in shape, it's hard to feel like I am even doing so when I'm pregnant, no matter what I do. People are funny. I have someone that I don't know ask me randomly at least once a day if I'm "due any day now". When I respond that I'm only halfway, they always ask if I'm having twins..."Nope, I'm just huge, thanks!" Anyway, life is generally a wonderful thing. I honestly love people. I don't mind the ignorant questions anymore, because hey, I'm kind of enormous and I can't really blame them for wondering. Most of the time they are people that clearly have not had kids or been pregnant, so they honestly don't know. Plus they probably (hopefully) feel silly afterwards for asking in the first place, so that thought always gives me some comfort. This is my 5th baby (and technically my 7th pregnancy), so I think I'm supposed to be huge, right???
Monday, January 25, 2016
Make-under Bratz Dolls...
 |
| My latest hobby... |


Since then, I've had people write and comment about different ideas that are out there for giving dolls make-unders. One of the ideas I absolutely loved was Sonia Singh's Tree Change Dolls. I checked them out, and decided, "Hey, I can do that!" And so Polly and I started making over some dollies! I should mention that before all of this, I wouldn't allow Bratz dolls in our house because quite frankly, I think they usually look like little prostitutes, and that's obviously not the example I want for my daughter...now however, I seriously am embarrassed about how large of a collection I've accumulated from Thrift stores and whatnot. I think I have close to 100! I'm totally obsessed! Does that make me crazy...? Anyway, after painting the dolls, we make them outfits, and sometimes even hats or shoes if they need them. Here's a few of the dolls we've done so far:
First off is Gabriella...
 |
| Before |
 |
| After |


This is Gabriella. Gabriella lives on a fruit farm in Chile and is almost always happy, because she's an optimist. She loves sunshine and the outdoors. She has two younger sisters and loves to help them and play with them. She is also a very hard worker, and loves being a big helper to her parents by helping harvest the many different types of fruit they grow in their various vineyards.
So for Gabriella, we were lucky that she came with a very cute little corduroy skirt and some fun flip flops, but we did decide to knit her a little sweater, and make a little basket of clay peaches, which we formed, baked and painted. The basket and hat came from the Thrift Store, along with Gabriella herself.
Next we made Erika...
 |
| Before |
 |
| After |
 |
| Feet Before |
 |
| Feet After |
 |
| Erika's After Outfit |
Here is Erika, named after one of Polly's Swiss Aunts, so naturally, Erika is from Switzerland. She needed a lot more work than Gabriella. We made her some overalls from one of my old pant hems, complete with little Swiss embroidered flowers. She was then given some clay boots, which were baked and painted, and are much more sensible than her high heels. We knit a cute little sweater for her, and finished her off with a little wicker "Swiss" hat that we found at the Thrift Store. Erika had her eyebrows painted about 3 times, the poor girl, but she was very patient with me while I practised my fine brush strokes. Her final eyebrows are shown in the top "after" picture.
Our 3rd Dolly was Kailey...
 |
| Before |
 |
| After |

Kailey underwent the biggest transformation of all in my opinion. She came in a large lot of used dolls I bought locally through an online website, and when we got her, her hair was pasted hard to her head with some kind of paint. It took several washes to get it all to come out. After we got her hair all washed up, we painted her face and knit her a little cabled sweater, then sewed a little hat and kilt to go with it as well, because Kailey is from Scotland of course (Polly's favourite part is coming up with a unique little story for each doll).
Our 4th Doll was Kiko...
 |
| Before |
 |
| After |
 |
| Feet Before |
 |
| Kiko's Outfit and Boots |
 |
| Kiko's Finished Boots When we bought Kiko (from the Thrift Store) we thought her hair would be red, but it turned out it was just discoloured from a thick layer of nicotine. She underwent several thorough bath treatments, and when she came out, her hair ended up actually being pink! We decided that she would make a very cute little city dweller from Tokyo, Japan. We kept her little t-shirt, and knit some cute little overall shorts for her, which went perfectly with her "built-in" purple leggings. We then experimented a little with her boots, this time using a mixture of silicone and corn starch to make some more flexible fitting rubber boots that pop on and off nicely. We painted and sealed her face and her boots, and put her hair up in two little buns.
My niece acquired a doll next, and asked if I would paint it for her...

Before

After
 This dolly needed to have a very colourful little outfit, because her hair was so colourful to begin with. We got her face painted, her sweat suit knit, and my niece even made her a little headband for her workouts!
Doll number 6 was Skye...

Before

After

Skye got a fun, freckled face paint, some overalls and a cardigan, then she borrowed Kiko's rain boots to go puddle jumping, because she doesn't yet have shoes of her own...
Here is Annabelle...

Before

After
 
I'm pretty sure Annabelle is Polly's favourite doll. She is from the deep south, and ready for a picnic. Polly is totally in love with the regency style dress we knit for her :) Her hat was one that I have had lying around forever and I never thought I'd use, but voila, we came up with the perfect use for it! Annabelle just wouldn't be quite herself without her hat.
Our final doll (so far) is Amara...

Before

After
 
Amara was very intimidating for me to paint. I was so worried about getting her facial features right and trying to bring out the perfect sparkle in her eye. She is my personal favourite, because I am absolutely in love with her hair! It's so soft and bouncy, and she came in near perfect condition from a doll collector that was cleaning out her collection. Polly dressed her in this little blue basket weave dress that I knit, along with Erika's borrowed boots, and a pair of glasses we had laying around. This won't be her final outfit I don't think, but I'm still debating on what kind of outfit would complete her look.
So there they are, Polly's Dolly's! That's all we've made for now, but I've written down all my little knitting patterns as I've went, and am hoping to slowly have them tested and available to all of you! Hope you enjoyed at all the transformations as much as we enjoyed making them!
|
Subscribe to:
Posts (Atom)