So far, I've come up with a cute little collared dress, the School Girl Dress Pattern, which is available here as a free download! I'll also be posting the matching knitted cardigan, the School Girl Cardigan Knitting Pattern shown in the pictures, which is available now on my official website. This cute little cardigan is quick and simple, and is the perfect accessory for your little dresses! Click the link to the Cardigan to access another free download, because c'mon, I just love you guys so much! I've made 3 dresses and 4 cardigans over the last couple of days, and I'm hooked! They're so much fun!
Meet my 3 newest little models: Rebecca (top), Violet (middle), and Anna (bottom). I'll post some before and after photos in the next couple of days so you can see their transformations. They've been super fun!


And, without further ado, here's a little dress tutorial to go along with the pattern.
First off, download and print the pattern pieces from one of the above links, and cut them all out.

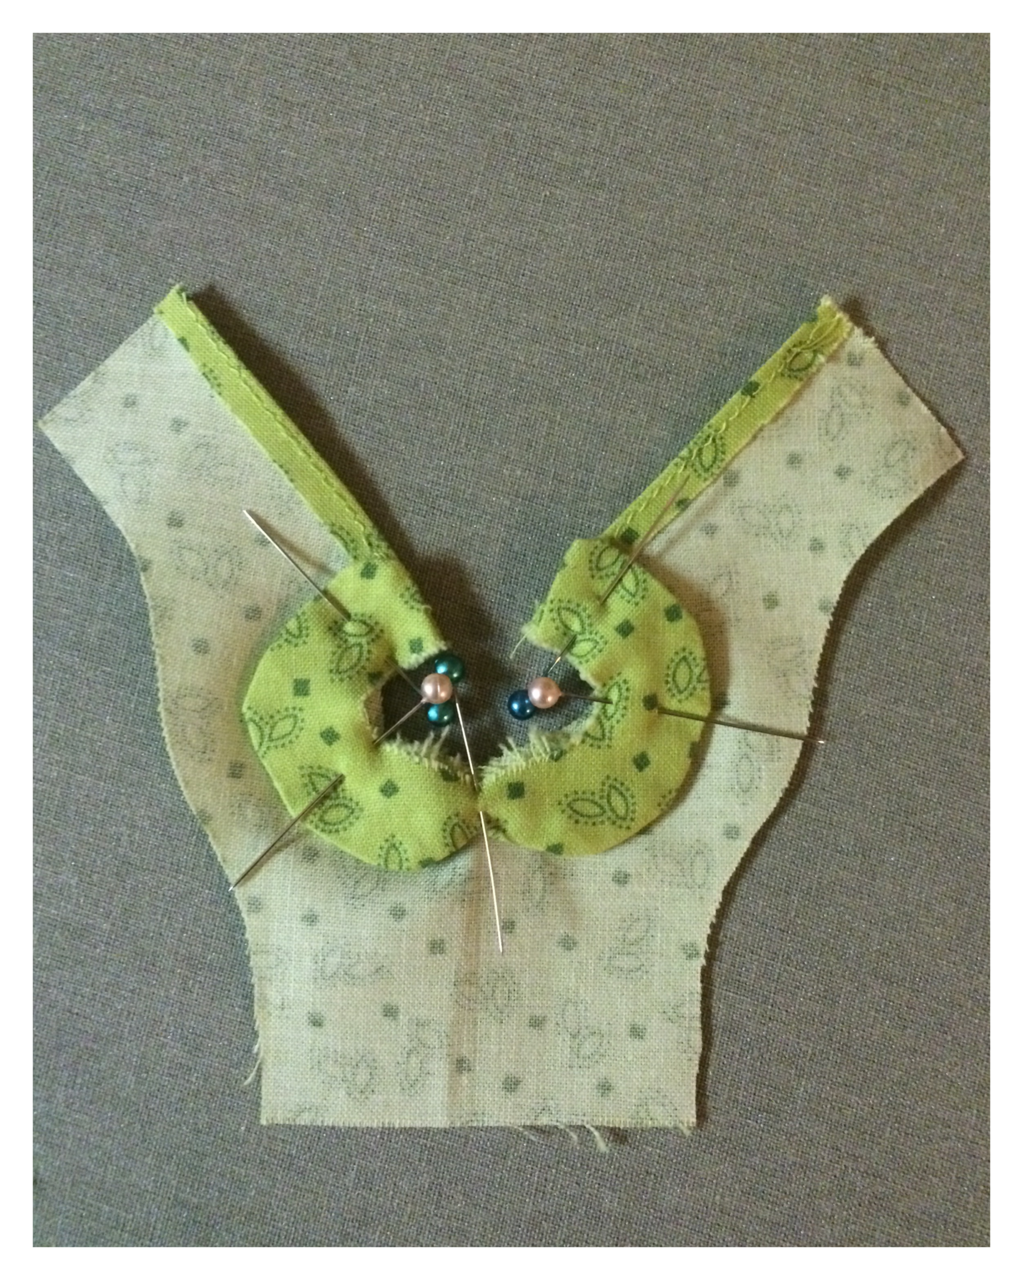
Next, use each pattern piece to cut out your corresponding fabric pieces (I used quilting cotton for my dresses). You should now have 2 collar pieces, 1 bodice piece, and 1 skirt piece, that will look something like this...

Just a hint before I continue, I did very small seams throughout. As small and teeny tiny as you can fold, iron and seam, that's the width of seam that will turn out the best. There's no 1/4" seams in this pattern, just as little and tiny as I you can manage while still obviously making sure it is secure and there are no holes. I also keep my iron out and iron down each seam I sew as I go.
With right sides together, sew 3 sides of collar together (the 2 short end edges and the outside edge).

Turn the collar right side out and iron.
Iron down and hem back edges of the bodice, as shown below. If you can manage doing some teeny tiny little seams, doing a double hem on these edges would give it a nicer finish (I thought of this later, so this picture shows a single hem, but I will do a double hem in the future.

Fold over collar to the right side and iron flat.

Create a tiny double hem for the sleeves, by folding and ironing the curved out part of the bodice where the arms will be (not down the entire outside edges, but just along the curved part until the edges straighten out). Hopefully that made sense...if not, refer to the picture.

Your finished sleeve seems should look something like this...

Fold bodice in half, with right sides facing each other. Pin in place and sew from the armpits down to the waistline.

Fold back to the right side, and iron flat.

Iron down and double hem both short edges and one long edge of the skirt.


Pull on ends of thread from the basting stitch to cinch the dress in, making the width of the skirt even with the bottom width of the bodice.

Pin in place and sew.

Top stitch across the bottom of the bodice for a nice finished join.

Pin Dress together with right sides facing, and sew dress closed from slightly below the waist seam down to the bottom of the dress.

The dress should now look something like this...


Cut a 2" length of velcro (9mm in width), then cut both sides vertically in half, creating 4 pieces (4.5mm each in width).

This will be enough for two dresses, so set one set aside for a later project.

Pin one side of the velcro to the inside edge of the dress, and the other side of the velcro to the outside edge of the dress on the opposite side of the back opening.
Note: Pinning the pieces overtop the collar will prevent the collar from flipping up, so I recommend you sew the collar down along with the velcro.

Sew around all four edges of the velcro pieces.

The back of the dress should now look like this...

And tada! Your dolly is all styled and ready to go. Now you just need to give her a nice, tasteful make-under to un-Bratify her :)

No comments:
Post a Comment